
Setup DHCP or static IP address from command line in Linux
Did you ever had trouble with Network Manager and felt that you need to try to setup DHCP or static IP address from command Line in Linux? I once accidentally removed Gnome (my bad, wasn’t paying attention and did an apt-get autoremove -y .. how bad is that.. ) So I was stuck, I couldn’t connect to Internet to reinstall my Gnome Network Manager because I’m in TEXT mode network-manager was broken. I learned a good lesson. you need internet for almost anything these days unless you’ve memorized all those manual command.
This guide will guide you on how to setup DHCP or static IP address from command Line in Linux. It saved me when I was in trouble, hopefully you will find it useful as well. In case you’ve only got Wireless, you can use this guide to connect to WiFi network from command line in Linux.
Note that my network interface is eth0 for this whole guide. Change eth0 to match your network interface.

Again, if you’re using static IP address, you might want to investigate what range is supported in the network you are connecting to. (i.e. some networks uses 10.0.0.0/8, some uses 172.16.0.0/8 etc. ranges). For some readers, this might be trial and error method, but it always works.
The first command updates /etc/network/interfaces file with eth0 interface to use DHCP.
Looks good to me so far. We’re almost there.
Try to ping http://google.com/ (cause if www.google.com is down, Internet is broken!):
Losing internet connection these days is just painful because we are so dependent on Internet to find usable information. It gets frustrating when you suddenly lose your GUI and/or your Network Manager and all you got is either an Ethernet port or Wireless card to connect to the internet. But then again you need to memorize all these steps.
I’ve tried to made this guide as much generic I can, but if you have a suggestion or if I’ve made a mistake, feel free to comment. Thanks for reading. Please share & RT.
This guide will guide you on how to setup DHCP or static IP address from command Line in Linux. It saved me when I was in trouble, hopefully you will find it useful as well. In case you’ve only got Wireless, you can use this guide to connect to WiFi network from command line in Linux.
Note that my network interface is eth0 for this whole guide. Change eth0 to match your network interface.
Static assignment of IP addresses is typically used to eliminate the network traffic associated with DHCP/DNS and to lock an element in the address space to provide a consistent IP target.
Step 1 : STOP and START Networking service
Some people would argue restart would work, but I prefer STOP-START to do a complete rehash. Also if it’s not working already, why bother?# /etc/init.d/networking stop [ ok ] Deconfiguring network interfaces...done. # /etc/init.d/networking start [ ok ] Configuring network interfaces...done.
Step 2 : STOP and START Network-Manager
If you have some other network manager (i.e. wicd, then start stop that one).# /etc/init.d/network-manager stop [ ok ] Stopping network connection manager: NetworkManager. # /etc/init.d/network-manager start [ ok ] Starting network connection manager: NetworkManager.Just for the kicks, following is what restart would do:
# /etc/init.d/network-manager restart
 [ ok ] Stopping network connection manager: NetworkManager.
 [ ok ] Starting network connection manager: NetworkManager.
Step 3 : Bring up network Interface
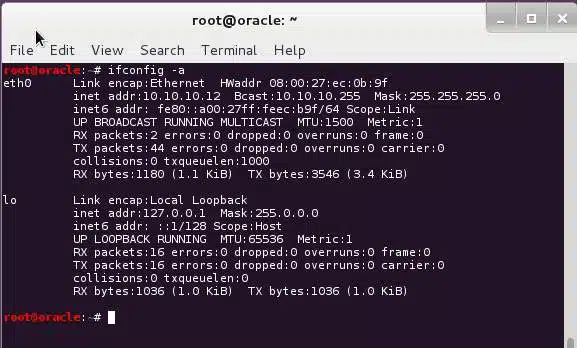
Now that we’ve restarted both networking and network-manager services, we can bring our interface eth0 up. For some it will already be up and useless at this point. But we are going to fix that in next few steps.# ifconfig eth0 up (or) # ifup eth0The next command shows the status of the interface. as you can see, it doesn’t have any IP address assigned to it now.
# ifconfig eth0 eth0 Link encap:Ethernet HWaddr aa:bb:cc:11:22:33 UP BROADCAST MULTICAST MTU:1500 Metric:1 RX packets:0 errors:0 dropped:0 overruns:0 frame:0 TX packets:0 errors:0 dropped:0 overruns:0 carrier:0 collisions:0 txqueuelen:1000 RX bytes:0 (0.0 B) TX bytes:0 (0.0 B)
Step 4 : Setting up IP address – DHCP or Static?
Now we have two options. We can setup DHCP or static IP address from command Line in Linux. If you decide to use DHCP address, ensure your Router is capable to serving DHCP. If you think DHCP was the problem all along, then go for static.Again, if you’re using static IP address, you might want to investigate what range is supported in the network you are connecting to. (i.e. some networks uses 10.0.0.0/8, some uses 172.16.0.0/8 etc. ranges). For some readers, this might be trial and error method, but it always works.
Step 4.1 – Setup DHCP from command Line in Linux
Assuming that you’ve already completed step 1,2 and 3, you can just use this simple commandThe first command updates /etc/network/interfaces file with eth0 interface to use DHCP.
# echo “iface eth0 inet dhcp” >>/etc/network/interfacesThe next command brings up the interface.
# ifconfig eth0 up (or) # ifup eth0With DHCP, you get IP address, subnet mask, broadcast address, Gateway IP and DNS ip addresses. Go to step xxx to test your internet connection.
Step 4.2 – Setup static IP, subnet mask, broadcast address in Linux
Use the following command to setup IP, subnet mask, broadcast address in Linux. Note that I’ve highlighted the IP addresses in red. You will be able to find these details from another device connected to the network or directly from the router or gateways status page. (i.e. some networks uses 10.0.0.0/8, some uses 172.16.0.0/8 etc. ranges)# ifconfig eth0 192.168.43.226 # ifconfig eth0 netmask 255.255.255.0 # ifconfig eth0 broadcast 192.168.43.255Next command shows the IP address and details that we’ve set manually.
# ifconfig eth0 eth0 Link encap:Ethernet HWaddr aa:bb:cc:11:22:33 inet addr:192.168.43.226 Bcast:192.168.43.255 Mask:255.255.255.0 UP BROADCAST RUNNING MULTICAST MTU:1500 Metric:1 RX packets:19325 errors:0 dropped:0 overruns:0 frame:0 TX packets:19641 errors:0 dropped:0 overruns:0 carrier:0 collisions:0 txqueuelen:1000 RX bytes:0 (0.0 B) TX bytes:0 (0.0 B)Because we are doing everything manually, we also need to setup the Gateway address for the interface. Use the following command to add default Gateway route to eth0.
# route add default gw 192.168.43.1 eth0We can confirm it using the following command:# route -n Kernel IP routing table Destination Gateway Genmask Flags Metric Ref Use Iface 0.0.0.0 192.168.43.1 0.0.0.0 UG 0 0 0 eth0 192.168.43.0 0.0.0.0 255.255.255.0 U 0 0 0 eth0
Step 4.3 – Alternative way of setting Static IP in a DHCP network
If you’re connected to a network where you have DHCP enabled but want to assign a static IP to your interface, you can use the following command to assign Static IP in a DHCP network, netmask and Gateway.# echo -e “iface eth0 inet dhcp\n address 10.1.1.2\n netmask 255.255.255.0\n gateway 10.1.1.1″>>/etc/network/interfacesAt this point if your network interface is not up already, you can bring it up.
# ifconfig eth0 up
(or)
# ifup eth0
Step 4.4 – Fix missing default Gateway
Looks good to me so far. We’re almost there.
Try to ping http://google.com/ (cause if www.google.com is down, Internet is broken!):
# ping google.com
 PING google.com (119.30.40.16) 56(84) bytes of data.
 64 bytes from cache.google.com (119.30.40.16): icmp_req=1 ttl=49 time=520 ms
 64 bytes from cache.google.com (119.30.40.16): icmp_req=2 ttl=49 time=318 ms
 64 bytes from cache.google.com (119.30.40.16): icmp_req=3 ttl=49 time=358 ms
 64 bytes from cache.google.com (119.30.40.16): icmp_req=4 ttl=49 time=315 ms
 ^C
 --- google.com ping statistics ---
 4 packets transmitted, 4 received, 0% packet loss, time 3002ms
 rtt min/avg/max/mdev = 315.863/378.359/520.263/83.643 ms
It worked!
Step 5 : Setting up nameserver / DNS
For most users step 4.4 would be the last step. But in case you get a DNS error you want to assign DNS servers manually, then use the following command:# echo “nameserver 8.8.8.8\n nameserver 8.8.4.4″ >>/etc/resolv.confThis will add Google Public DNS servers to your resolv.conf file. Now you should be able to ping or browse to any website.
Conclusion
Losing internet connection these days is just painful because we are so dependent on Internet to find usable information. It gets frustrating when you suddenly lose your GUI and/or your Network Manager and all you got is either an Ethernet port or Wireless card to connect to the internet. But then again you need to memorize all these steps.
I’ve tried to made this guide as much generic I can, but if you have a suggestion or if I’ve made a mistake, feel free to comment. Thanks for reading. Please share & RT.
Post a Comment